
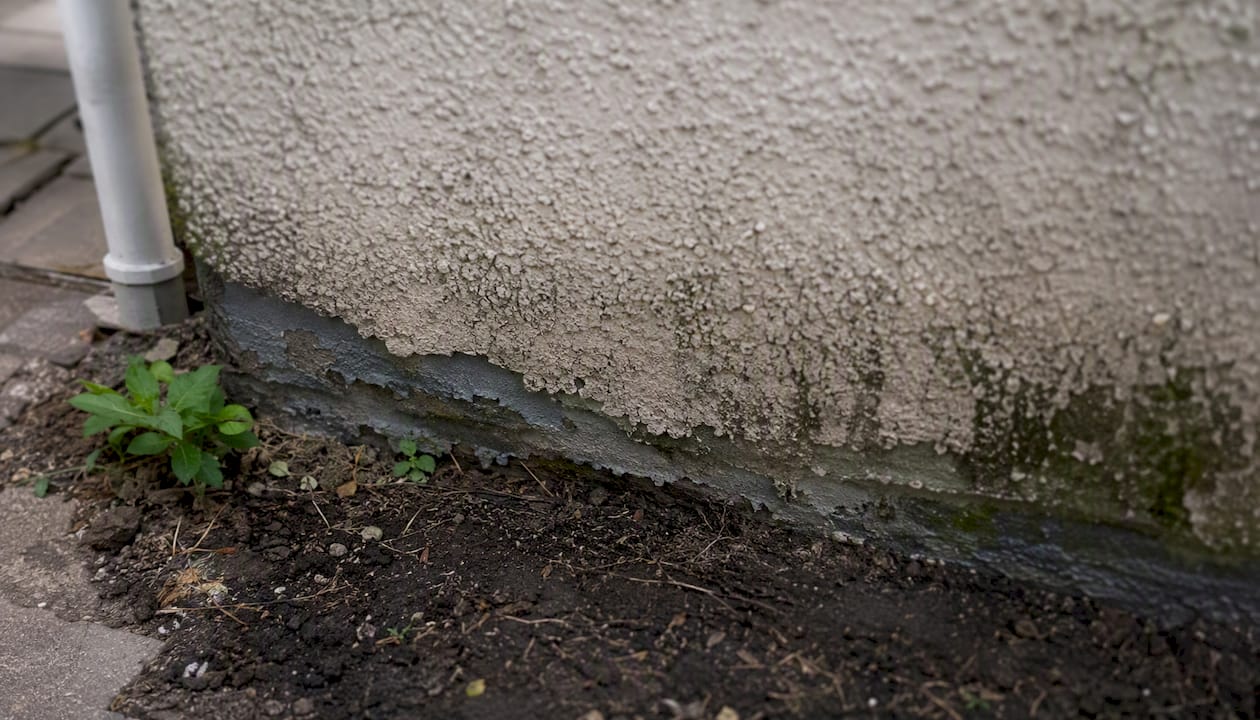
If your render runs down to ground level or touches paving, it is very likely bridging the damp proof course, and the fix is usually simple: cut the render back, expose the DPC line, and fit a drip bead rather than replace the damp course itself. This single distinction saves homeowners thousands of pounds every year, because a bridged DPC and a genuinely failed DPC look identical on an internal wall but need entirely different treatment.
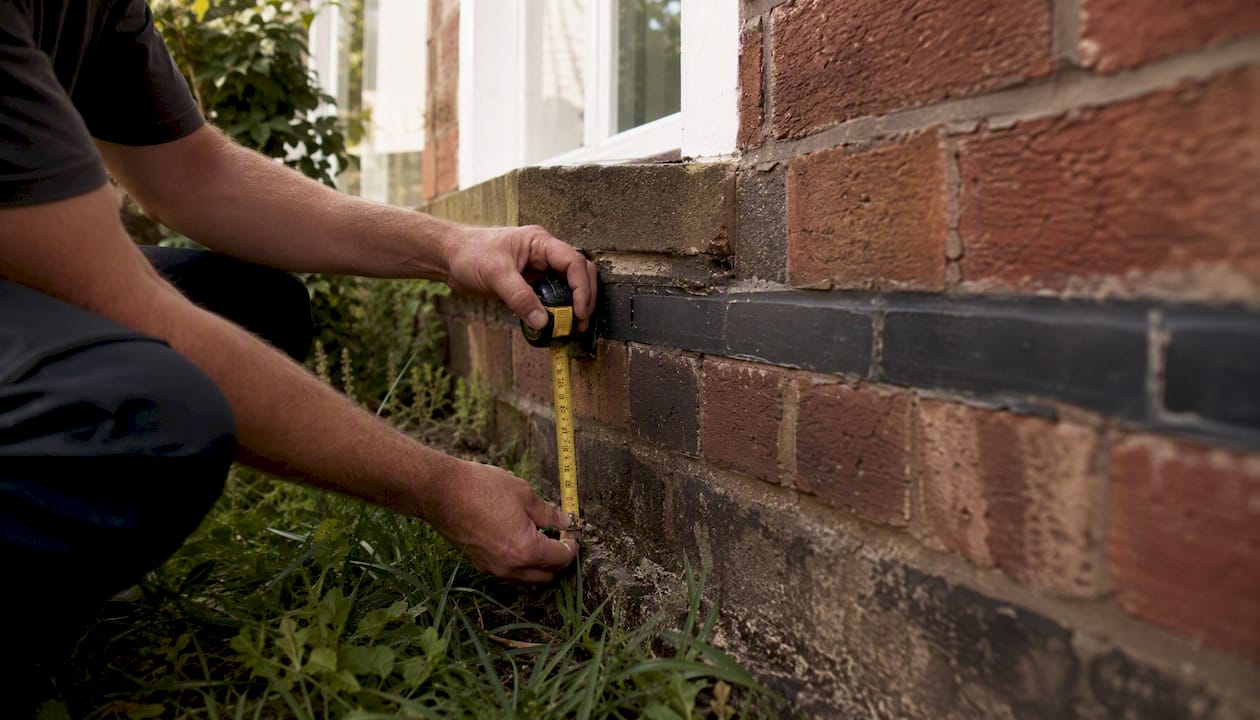
Before you call anyone, check three things. Look for the DPC marker itself, usually a slate strip, a black plastic membrane, or a subtle change in brick or block course roughly two courses up from ground level. Note whether the damp patch inside stops at a consistent height, which points towards bridging rather than a chemical DPC failure. Photograph the external wall where render, paving, or soil meets the brickwork.
- Photograph the affected wall from outside and inside, including a tape measure against the DPC line.
- Measure the external ground or paving level against the DPC marker.
- Check whether airbricks are blocked, painted over, or buried under render or paving.
- Only arrange a full damp survey if the bridge is not obvious from these checks.
Pro Tip: Take your photos on a dry day after several days without rain. A damp patch that appears only after wet weather often points to a different problem, such as a leaking gutter, rather than DPC bridging.
Trust signals worth knowing at this stage: the Royal Institution of Chartered Surveyors sets out how bridging differs from DPC failure, and the Property Care Association is the recognised trade body for damp diagnosis if you do need an independent survey. For Liverpool and Merseyside homeowners, Ajcandsonbuilders sees this exact fault pattern regularly on older render and pebble-dash properties, where render was simply carried down to ground level decades ago without a thought for the DPC beneath it.
Key Takeaways
Render bridging the DPC is usually fixed by removing the physical bridge, not by replacing the damp proof course itself, and diagnosis should always start with a ground-level check.
| Point | Details |
|---|---|
| Check DPC height first | Compare the DPC marker against external ground or paving; anything under 150mm is a red flag. |
| Photograph before acting | Capture wide, close-up, and measured shots of the wall for your own record or a surveyor. |
| Cut back, don’t inject | Removing render and fitting a drip bead usually resolves bridging without chemical DPC treatment. |
| Get a written survey first | Insist on moisture mapping and salt testing before agreeing to major damp treatment. |
| Ajcandsonbuilders offers cause-led repairs | Site survey and written proposal precede any render, ground, or replastering work in Liverpool and Merseyside. |
Table of Contents
- What does render bridging DPC actually mean?
- What are the common causes of DPC bridging?
- How do you diagnose DPC bridging correctly?
- How do you fix render that’s bridging the DPC?
- Should you DIY this or call a professional?
- How long does the wall take to dry after fixing DPC bridging?
- What does fixing DPC bridging typically cost?
- How can you stop render from bridging the DPC again?
- A builder’s view: fixing render that had bridged a DPC in Liverpool
- The conventional damp advice gets the order backwards
- How Ajcandsonbuilders can help with render bridging DPC repairs
- Sources
What does render bridging DPC actually mean?
Bridging means a physical path, usually render, mortar, soil, or paving, lets moisture climb past a damp proof course that is otherwise doing its job perfectly well. The DPC is not broken. It is being ignored, because something built or grown against the wall gives moisture a route around it rather than through it.
This matters because the standard fix for a failed DPC, chemical injection, does nothing for bridging. If moisture is simply walking over the top of the barrier via wet render or a raised flowerbed, injecting more DPC chemical into the wall changes nothing. The Property Defect Guide notes that bridging by render, raised patios, or internal plaster taken below the DPC line is one of the most common causes of apparent rising damp, and that correct diagnosis matters precisely because injections will not resolve it.
Under Approved Document C of the Building Regulations, the DPC should sit a minimum of 150mm above external ground or paving level. That figure gives you a fast, practical yardstick: measure from your DPC marker down to the nearest path, patio, or flowerbed. If it is less than 150mm, or if render physically covers that gap, bridging is a realistic explanation for the damp you are seeing.
A failed DPC, by contrast, tends to produce a more even damp band around most of a solid wall’s perimeter, often with a tidemark and salt staining that follows the original barrier height rather than an external feature. Bridging usually shows a much more localised pattern, tracking a specific patio edge, a rendered section, or a flowerbed, rather than affecting the whole ground floor evenly.
What are the common causes of DPC bridging?
Most bridging faults fall into a short list of repeat offenders, and recognising which one applies to your property narrows down the fix considerably.
- Render taken to ground level. Older properties, and a surprising number of recent re-renders, extend the finish straight down past the DPC line with no stop bead or gap.
- Pebble dash or textured coatings below the DPC. These trap moisture against the brickwork even more effectively than smooth render, because the rough surface holds water longer.
- Raised paving, patios, or decking. Any hard surface built up against the wall above the 150mm minimum instantly creates a bridge, even if the render itself is correctly detailed.
- Soil and planting beds banked against the wall. Flowerbeds piled up for aesthetic reasons are one of the most common causes surveyors see, and they are entirely avoidable.
- Internal plaster or screed taken below the DPC. A new floor screed or plaster skim that runs past the internal DPC line creates a bridge from the inside, invisible until the damp patch appears.
- Cavity debris or slumped insulation. In cavity wall properties, mortar snots or fallen insulation can form a bridge across the cavity itself, carrying moisture from the outer to the inner leaf.
Look for a low, level band of damp that lines up precisely with an external feature, patchy salt bloom on the plaster surface, and a fault confined to one wall rather than spread through the whole ground floor. That combination is a strong clue.
Practitioners who specialise in bridging faults describe a similar theme repeatedly.
Bridging frequently follows later changes to a property, patios added, plaster replaced, screeds laid, and a focused, local repair usually resolves the damp without any need for chemical DPC treatment.
When you take photographs for a surveyor, capture the wall from a few metres back to show the general context, a close-up of where render or paving meets the brickwork, and a shot with a tape measure against the DPC marker. Those three images alone often let an experienced eye make a preliminary judgement before anyone visits.
How do you diagnose DPC bridging correctly?
Start outside, not inside. Locate the DPC marker and compare it against every external surface touching that wall: render, paving, soil, and any timber decking or steps. This single comparison resolves a large share of bridging cases before you pick up a moisture meter.
Once you have the visual survey done, a few simple tools confirm or rule out bridging with reasonable confidence.
- Use a moisture meter to map readings up the wall in a grid pattern; bridging typically shows elevated readings low down that drop off sharply above the bridge point, rather than a gradual taper you would expect from capillary rising damp.
- Carry out a hygroscopic salt check on the plaster surface; salt contamination without a matching even damp band across the whole wall often points to a historical or localised moisture source rather than a failed DPC.
- Check airbricks and sub-floor ventilation; blocked, buried, or painted-over vents starve suspended timber floors of airflow and can mimic or worsen a bridging problem.
- Where a cavity wall is involved, a professional cavity inspection using a borescope can reveal debris or insulation bridging the gap, something you cannot check from ground level with a torch.
Verifying external ground levels against the DPC should be the very first diagnostic step on any damp call, because a bridged DPC is one of the most commonly misdiagnosed defects in UK housing stock.
Readings that drop off cleanly above a known external feature, rather than fading gradually with height, are the pattern most consistent with bridging rather than chemical DPC failure.
Pro Tip: Never drill into a wall to check for damp near a light switch, socket, or cable route without isolating the circuit first. If in doubt about what is behind the plaster, stop and bring in a qualified surveyor rather than risk hitting wiring or a gas pipe.
If your own checks are inconclusive, or the pattern does not clearly match either bridging or a failed DPC, this is the point to commission a written report. A surveyor working to Property Care Association or RICS-referenced methods will use moisture mapping and salt testing to build an evidence-based diagnosis rather than guessing from a single meter reading.
How do you fix render that’s bridging the DPC?
Fixing a bridge is almost always cheaper and faster than replacing a DPC, and the sequence below reflects the order most experienced tradespeople follow, starting with the lowest-cost, highest-impact step.
- Cut back the render to a clean line at least 25mm above the DPC, working carefully to avoid damaging sound brickwork above the cut line.
- Fit a purpose-made drip bead or stop bead at that cut line, so any water running down the render face is forced to drip clear of the wall rather than tracking behind the new edge.
- Reinstate ventilation by clearing, unblocking, or replacing any airbricks that were buried or painted over during the original render job.
- Lower external paving or paths, or regrade soil beds, wherever the ground level sits above the 150mm minimum gap to the DPC.
- Add a drainage channel or gravel margin where regrading alone will not achieve enough fall away from the wall.
- Remove contaminated internal plaster back to sound brickwork, well beyond the visible damp line, since salts embedded in the surface will keep drawing moisture long after the external bridge is gone.
- Allow the wall to dry fully before replastering with a salt-resistant render or plaster system and a breathable decorative finish.
Trade guidance on this exact repair recommends cutting render back to a line just above the DPC and fitting a specialist drip bead before re-rendering down to that bead. Installing a pronounced drip bead does two jobs at once: it forces water to fall clear of the wall face, and it stops moisture tracking underneath the new render edge back towards the brickwork.
A few workmanship points make the difference between a repair that lasts and one that fails again within a year:
- Never re-render straight back down to ground level, even with a “waterproof” finish. Impermeable coatings at the base trap moisture rather than shedding it.
- Choose a drip bead rated for external use with adequate projection, not a cheap plastic strip designed for internal angles.
- Protect internal finishes, floor coverings, and furniture from dust during render removal, and check for buried cables or pipework before cutting.
- Where timbers such as skirtings or floor joists sit near the affected area, inspect them for decay before closing the wall back up.
Should you DIY this or call a professional?
Some of this work sits comfortably within a competent homeowner’s skill set. Other parts carry real structural or safety risk and belong with a professional every time.
Photographing the wall, measuring external ground levels against the DPC marker, and clearing a blocked airbrick of leaves or debris are all reasonable DIY tasks. Trimming a small, accessible section of render where the DPC line is clearly visible and there is no risk to structural fixings can also be done by a confident DIYer, though homeowner forum discussions on this exact job consistently flag it as trickier than it looks and recommend researching proper render technique or bringing in a professional if you are unsure.
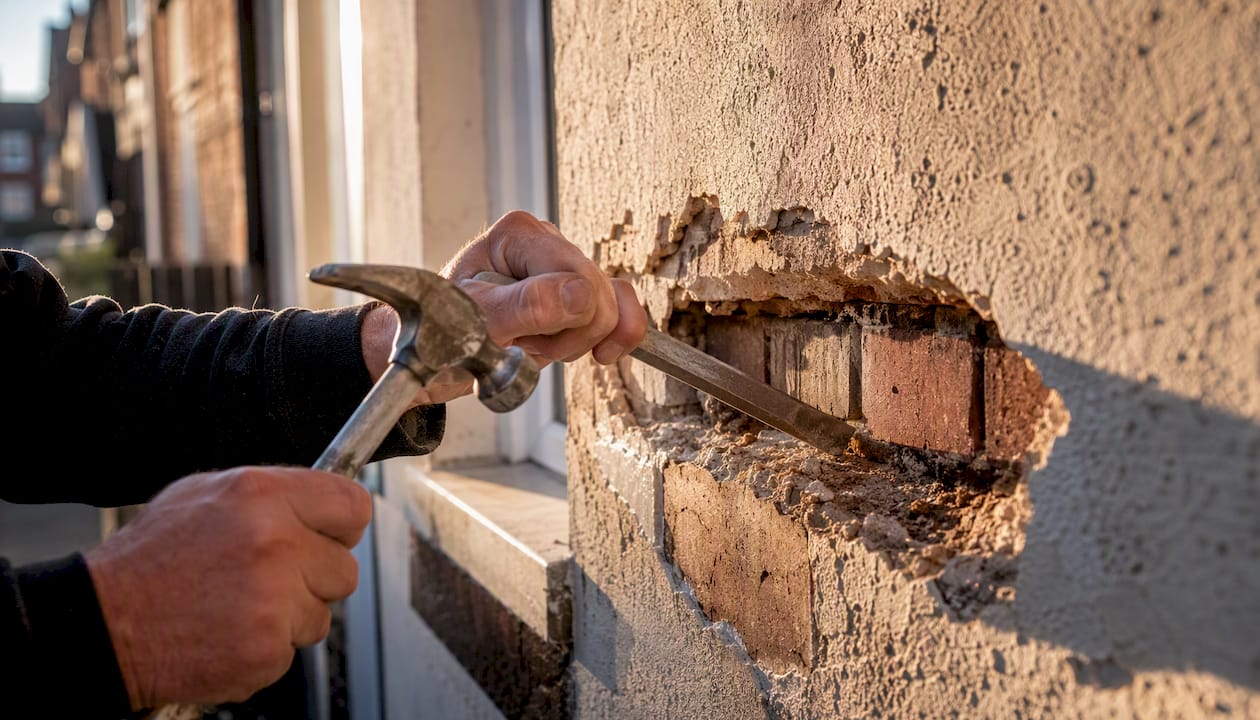
Cutting back larger areas of render, especially where structural fixings, cables, or pipework might be nearby, is professional territory. So is lowering slabs or regrading a patio, which often involves shifting genuine weight and getting falls correct so water does not simply pool somewhere else. Cavity inspections need a borescope and the experience to interpret what it shows. Anything touching electrics or plumbing near the affected wall should stop a DIY job immediately.
If you do bring in a surveyor or contractor, a short list of questions will tell you quickly whether they understand the difference between bridging and a failed DPC:
- Will you check external ground and paving levels against the DPC before recommending any treatment?
- Will the survey include moisture mapping and salt testing, not just a single meter reading?
- Will you inspect the cavity for debris if this is a cavity wall property?
- Can I have the findings and recommendation in writing before agreeing to any chemical DPC work?
| Cause | Recommended remedial action | DIY vs professional | Typical cost range | Expected drying time |
|---|---|---|---|---|
| Render taken below DPC | Cut back render, fit drip bead | Small sections: competent DIY; larger areas: professional | £150 | 4 weeks |
| Raised paving or patio | Lower slabs, add fall away from wall | Professional | £1,500 | Immediate, once excavation complete |
| Soil or flowerbed against wall | Regrade soil, clear 150mm gap | DIY | £100 | Immediate |
| Blocked or buried airbricks | Clear, reinstate, or replace airbricks | DIY for clearing; professional for replacement | £150 per airbrick | Weeks, as sub-floor ventilation improves |
| Cavity debris bridging inner leaf | Cavity inspection, debris removal | Professional | £300 | 4 to 12 weeks |
RICS guidance backs this general approach directly: where bridging is confirmed, the DPC itself usually does not need replacing, and repair typically means removing the physical bridge and correcting drainage or ground levels rather than expensive chemical injection.
How long does the wall take to dry after fixing DPC bridging?
Solid masonry walls dry slowly, and setting realistic expectations now avoids the frustration of replastering too early and watching the problem return. A wall that has been damp for years, especially one with salt contamination in the plaster, can take several months to dry fully once the bridge is removed, and drying speed depends heavily on wall thickness, ventilation, ambient humidity, and the time of year the work is carried out.
Keep a simple monitoring routine going through the drying period:
- Take moisture meter readings at the same points every few weeks and log them, so you can see a genuine downward trend rather than guessing.
- Watch for fresh salt bloom on any exposed brickwork; persistent salt staining after several weeks suggests contamination that will need cutting out before replastering.
- Photograph the wall periodically, ideally under similar lighting, to build a visual record for your own reference or for a surveyor.
- Note heating and ventilation conditions during drying, since a heated, well-ventilated room dries far faster than a cold, closed-up one.
Once readings stabilise at a low, consistent level, it is generally safe to replaster using a salt-resistant render or plaster system with a breathable decorative finish over the top. Trade practice on removing bridging render suggests taking sound plaster back well beyond the visible damp line, since salts embedded below the surface will keep drawing atmospheric moisture even after the external bridge has gone and the wall looks dry.
Dehumidifiers can speed drying in enclosed rooms, and portable heaters help in cold months, but run both cautiously. Excessive heat applied too quickly can crack render or plaster before the moisture beneath has had a chance to migrate out evenly.

What does fixing DPC bridging typically cost?
Cost varies enormously depending on the scale of the bridge and how much associated work it triggers, so treat any figure here as a starting point for conversation rather than a quote.
Several factors drive the price up or down on a typical UK job: access to the affected wall, how much render needs removing, whether excavation or slab-lowering is involved, whether a cavity needs opening up and inspecting, scaffolding requirements on taller walls, and regional labour rates, which tend to run higher in and around major cities than in smaller towns.
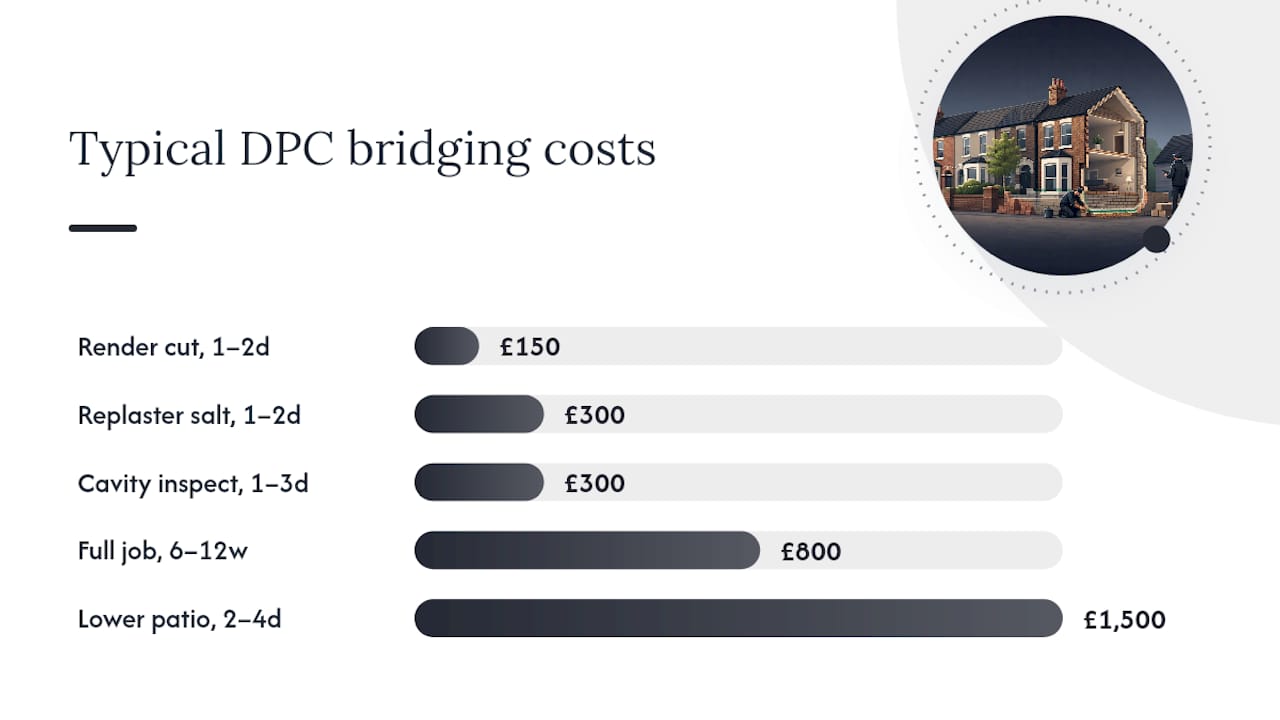
| Cost driver | Typical UK range | Typical timescale |
|---|---|---|
| Cutting back render and fitting drip bead (small section) | £150 | 1 to 2 days |
| Lowering a small patio or path | £1,500 | 2 to 4 days |
| Replastering a small affected area with salt-resistant system | £300 | 1 to 2 days, plus drying time |
| Cavity inspection and debris clearance | £300 | 1 to 3 days |
| Full diagnosis to completion, moderate-sized job | £800 | 6 to 12 weeks including drying |
These ranges assume a site survey has confirmed the scope of work. Every property is different, and a proper quote should always follow a site visit rather than a phone estimate. A written damp survey before any major spend, particularly before agreeing to chemical DPC treatment, is the single best way to avoid paying for the wrong fix entirely.
How can you stop render from bridging the DPC again?
Prevention here is genuinely low effort compared with the cost of a repeat repair, and most of it comes down to keeping a clear watch on what happens right at ground level around your property.
- Keep external ground, paving, and any new decking at least 150mm below the DPC line, matching the Approved Document C minimum.
- Maintain a gentle fall away from the wall so rainwater drains away rather than pooling against the brickwork.
- Keep airbricks clear of plants, debris, and paint, and check them after any landscaping work near the house.
- Start new render at least 25mm above the DPC line and always insist on a drip bead at that junction.
- Avoid impermeable coatings or sealants right at the base of a wall, since they trap moisture rather than letting it evaporate.
- Check ground and paving levels every time you have landscaping, a new patio, or a driveway installed near the house.
- Inspect airbricks each autumn before leaves and debris build up around the base of the wall.
- Walk the perimeter of the property annually looking specifically at where render, paving, and soil meet the brickwork.
If you are planning a wider renovation that touches the building’s exterior, this is also the natural point to review render options for the whole property rather than patching one section in isolation.
A builder’s view: fixing render that had bridged a DPC in Liverpool
A recent job for Ajcandsonbuilders in Merseyside involved a semi-detached property where a previous owner had re-rendered the whole ground floor decades earlier, carrying the finish straight down to a raised concrete path with no gap at all. The homeowner had already been quoted for a full chemical DPC injection by another contractor before getting a second opinion.
The diagnostic checks were straightforward: the DPC marker sat roughly 100mm above the render line, moisture meter readings showed a sharp drop-off about 300mm up the wall rather than a gradual taper, and salt testing on the internal plaster confirmed contamination consistent with a long-standing bridge rather than active rising damp.
Once we exposed the DPC and saw the render running straight past it into a raised path, the diagnosis was obvious. The homeowner had been quoted for an injection that would have done nothing for the actual cause.
The remedial sequence followed the standard order: cutting back render to a clean line above the DPC, fitting a drip bead, lowering a short section of the concrete path that had been built up over the years, and stripping contaminated internal plaster back to sound brickwork ready for a salt-resistant replaster once the wall had dried.
Pro Tip: If you’re getting quotes for damp work on an older Merseyside property, ask each contractor specifically whether they checked external ground levels before recommending chemical treatment. It is the fastest way to tell whether you’re dealing with someone who diagnoses properly or someone reaching for the standard fix.
For anyone weighing up a wider exterior repair alongside the DPC fix, Ajcandsonbuilders’ brickwork repair guidance covers the kind of associated masonry work that often surfaces once render comes off an older wall.
The conventional damp advice gets the order backwards
Most homeowners who suspect rising damp go straight to a company offering chemical DPC injection, because that is what “damp treatment” has come to mean in the public imagination. That instinct is understandable and usually wrong. A bridged DPC produces symptoms that look identical to a failed one from inside the house, which means the industry built around injecting new damp courses has a structural incentive never to check the cheaper explanation first.
What gets underrated in most consumer guidance is how quick and cheap the actual diagnostic step is. Measuring ground levels against a DPC marker takes minutes and costs nothing. Yet it is routinely skipped in favour of jumping straight to treatment, partly because injection is a sellable product with a clear price tag, and a fifteen-minute level check is not.
The gap between what damp treatment companies promise and what most damp problems actually need is wider than homeowners realise. A genuinely failed DPC is far less common than render, paving, or soil simply bridging a perfectly good one. Prioritise the free checks first: DPC height, render line, airbrick condition. Only once those rule out bridging does it make sense to discuss chemical treatment at all, and even then, get that recommendation in writing from someone who has actually looked at the external levels, not just the internal damp reading.
How Ajcandsonbuilders can help with render bridging DPC repairs
Ajcandsonbuilders offers a cause-led alternative to jumping straight to expensive chemical DPC treatment: a proper site visit and written damp survey first, so you only pay for the work your property actually needs. Serving Liverpool and Merseyside, the team handles the full sequence this article has walked through, from render removal and drip bead installation to ground regrading, repointing, and replastering with salt-resistant systems.

The standard process starts with a site survey, followed by moisture mapping and a costed written proposal before any work begins, so you can see exactly what is being fixed and why. Where a project extends beyond the immediate damp repair, whether that is wider renovation work or a full exterior refresh, the same team can manage staged works from diagnosis through to final decoration.
If render or ground levels near your home look like they might be bridging the DPC, get in touch with Ajcandsonbuilders to book a site survey and receive a written proposal before committing to any remedial work.
Sources
- Bridged damp proof course (DPC) and raised ground — RICS consumer guide
- Rising damp caused by bridged damp proof course — Property Defect Guide
- Squote
- Property Care Association